canal-adapter实时增量同步多数据源数据(Mysql-Es)
编辑
1、准备
1)使用canal-server需要先准备mysql,对于自建 MySQL , 需要先开启 Binlog 写入功能,配置 binlog-format 为 ROW 模式,/mysql.conf.d/mysqld.cnf中配置如下:
[mysqld]
log-bin=mysql-bin # 开启 binlog
binlog-format=ROW # 选择 ROW 模式
server_id=1 # 配置 MySQL replaction 需要定义,不要和 canal 的 slaveId 重复
需要注意binlog-do-db是否存在指定开启数据库如果配置了只会打印此数据库binlog日志
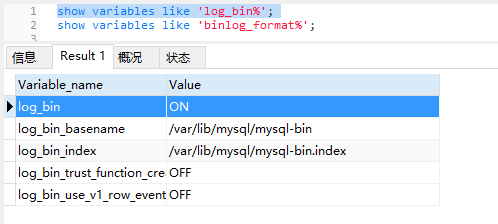
配置完成后重启mysql,并查询是否配置生效:
show variables like 'log_bin%';
show variables like 'binlog_format%';

3、创建实例
canal-server启动完成后访问canal-admin链接(IP:8089)因为docke启动的时候配置admin地址,canal-admin服务管理里会自动识别到canal-server的服务

第一步:现在 Instance 管理里添加多个实例,先输入实例名称和选择服务,点击载入模板修改数据库配置
...
# position info
canal.instance.master.address=192.168.8.128:3306
...
# username/password
canal.instance.dbUsername=canal
canal.instance.dbPassword=linewell@123
# table regex
canal.instance.filter.regex=archives_center\\..*
# mq config
canal.mq.topic=example
canal.mq.partition=0第二部:在Server 管理中选择操作下拉框配置,在配置文件99行添加刚配置的实例名称,多个用,(逗号)隔开
#################################################
######### 		destinations		#############
#################################################
canal.destinations = official,center
5、docker安装canal-adapter
拉取镜像
docker pull liazhan/canal-adapter:v1.1.5注意: 1.1.5版本有时间同步bug, 会将名称相似的时间字段同时更新, 1.1.6版本已修复但未发版本.
1.1.6版本暂时未发布, 解决办法为下载源码手动导出镜像, 现在安装adapter是需要上传镜像包手动导入镜像:
docker load < canal-adapter_v1.1.6.tar canal/canal-adapter:1.1.6
运行容器
docker cp canal-adapter:/opt/canal/adapter/conf /home/docker/canal-adapter
docker run -d -p 8081:8081 \
-v /home/docker/canal-adapter/conf:/opt/canal/adapter/conf \
-v /home/docker/canal-adapter/logs:/opt/canal/adapter/logs \
--name canal-adapter \
canal/canal-adapter:v1.1.6
6、同步脚本配置
修改/conf/application.yml配置文件中的canalServerHost、数据源及instance和ES服务器地址
server:
  port: 8081
spring:
  jackson:
    date-format: yyyy-MM-dd HH:mm:ss
    time-zone: GMT+8
    default-property-inclusion: non_null

canal.conf:
  mode: tcp #tcp kafka rocketMQ rabbitMQ
  flatMessage: true
  zookeeperHosts:
  syncBatchSize: 1000
  retries: 0
  timeout:
  accessKey:
  secretKey:
  consumerProperties:
    # canal tcp consumer
    canal.tcp.server.host: 172.17.0.5:11111
    canal.tcp.zookeeper.hosts:
    canal.tcp.batch.size: 500
    canal.tcp.username:
    canal.tcp.password:
  srcDataSources:
    #可以配置多个监控数据源名称自定义不可重复
    sourceDB1:
      url: jdbc:mysql://172.17.0.4:3306/pre_archives_center?serverTimezone=GMT%2B8&useUnicode=true&characterEncoding=utf8&useSSL=false&allowMultiQueries=true
      username: canal
      password: 123456
    sourceDB2:
      url: jdbc:mysql://172.17.0.4:3306/pre_archives_center?serverTimezone=GMT%2B8&useUnicode=true&characterEncoding=utf8&useSSL=false&allowMultiQueries=true
      username: canal
      password: 123456
  canalAdapters:
  - instance: official # 对应实例名称 多个实例创建多个
    groups:
    - groupId: g1
      outerAdapters:
      - name: logger
      - name: es7
        hosts: 172.17.0.8:9300
        properties:
          mode: transport # or rest
#          # security.auth: test:123456 #  only used for rest mode
          cluster.name: docker-cluster
  - instance: center # 对应实例名称 多个实例创建多个
    groups:
    - groupId: g1
      outerAdapters:
      - name: logger
      - name: es7
        hosts: 172.17.0.8:9300
        properties:
          mode: transport # or rest
#          # security.auth: test:123456 #  only used for rest mode
          cluster.name: docker-cluster
#      - name: rdb
#        key: mysql1
#        properties:
#          jdbc.driverClassName: com.mysql.jdbc.Driver
#          jdbc.url: jdbc:mysql://127.0.0.1:3306/mytest2?useUnicode=true
#          jdbc.username: root
#          jdbc.password: 121212
#      - name: rdb
#        key: oracle1
#        properties:
#          jdbc.driverClassName: oracle.jdbc.OracleDriver
#          jdbc.url: jdbc:oracle:thin:@localhost:49161:XE
#          jdbc.username: mytest
#          jdbc.password: m121212
#      - name: rdb
#        key: postgres1
#        properties:
#          jdbc.driverClassName: org.postgresql.Driver
#          jdbc.url: jdbc:postgresql://localhost:5432/postgres
#          jdbc.username: postgres
#          jdbc.password: 121212
#          threads: 1
#          commitSize: 3000
#      - name: hbase
#        properties:
#          hbase.zookeeper.quorum: 127.0.0.1
#          hbase.zookeeper.property.clientPort: 2181
#          zookeeper.znode.parent: /hbase
6、同步脚本编写
dataSourceKey: officialDS #监控数据源
destination: official #实例
groupId: g1 #分组
esMapping:
  _index: official_archives_info
  _type: _doc
  _id: _id
  sql: "SELECT
  t.unid as _id,
        t.unid,
        t.system_id as systemId,
        t.config_id as configId,
        t.province_code as provinceCode,
        t.city_code as cityCode,
        t.area_code as areaCode,
        t.dept_code as deptCode,
        t.document_code as documentCode,
        t.document_title as documentTitle,
        t.completed_time as completedTime,
        t.archive_code as archiveCode,
        t.accept_type as acceptType,
        t.version,
        t.archive_path as archivePath,
        t.archive_state as archiveState,
        t.accept_flag as acceptFlag,
        t.withdraw_node as withdrawNode,
        t.accept_time as acceptTime,
        t.pack_flag as packFlag,
        t.pack_time as packTime,
        t.encry_flag as encryFlag,
        t.encry_type as encryType,
        t.encry_password as encryPassword,
        t.encry_time as encryTime,
        t.check_flag as checkFlag,
        t.check_time as checkTime,
        t.audit_flag as auditFlag,
        t.audit_opinion as auditOpinion,
        t.audit_time as auditTime,
        t.transfer_flag as transferFlag,
        t.transfer_time as transferTime,
        t.failure_cause as failureCause,
        t.overdue_time as overdueTime,
        t.expired_time as expiredTime,
        t.batch_id as batchId,
        t.create_time as createTime,
        t.update_time as updateTime
FROM
        official_archives_info AS t
"
  #etlCondition: "where t.update_time>={}"
  commitBatch: 3000
参考文献
1、Docker安装ElasticSearch
https://blog.csdn.net/qq_32101993/article/details/100021002
2、docker安装elasticsearch及head插件
https://www.cnblogs.com/afeige/p/10771140.html
3、Docker容器ElasticSearch-Head创建索引无响应406
https://blog.csdn.net/gang_luo/article/details/104210051/
4、docker搭建cerebro(elasticsearch监控工具)
https://blog.csdn.net/wyfsxs/article/details/89305935
5、使用Docker安装IK分词器
https://blog.csdn.net/qq_49470767/article/details/112463810
6、安装Kibana:7.6.2完整教程
https://blog.csdn.net/WoAiShuiGeGe/article/details/106647832
7、docker部署elk时汉化Kibana服务
https://www.cnblogs.com/abclife/p/12697866.html
8、docker logstash安装
https://blog.csdn.net/qq_33547169/article/details/86629261
9、docker安装canal同步mysql8与elasticsearch7数据
https://blog.csdn.net/daziyuanazhen/article/details/106098887
10、github——canal
- 0
- 0
-
赞助
 赞赏
赞赏
-
分享
